Introduction: Why Basement Waterproofing Matters
Basement waterproofing isn’t just a line item on your home improvement checklist—it’s a fundamental investment in your property’s longevity, value, and health. Whether you use your basement as a storage area, living space, or utility room, persistent moisture can lead to structural damage, costly repairs, and unhealthy living conditions caused by mold and mildew. Many homeowners underestimate the complexity of keeping a basement dry, only to find themselves dealing with water leaks after heavy rain or spring thaws. In this comprehensive guide, we’ll break down the true costs of basement waterproofing, examine proven methods for various foundation types, and lay out maintenance essentials you can’t afford to ignore. By the end, you’ll have the knowledge to make smart decisions, avoid common pitfalls, and ensure your basement remains a dry, safe, and valuable asset to your home.
Understanding the Causes of Basement Moisture
Common Sources of Water Intrusion
- Surface water: Poor grading, clogged gutters, or downspouts that discharge too close to the foundation.
- Groundwater: Rising water tables or hydrostatic pressure forcing water through foundation walls and floors.
- Plumbing leaks: Broken pipes, leaking water heaters, or faulty sump pumps.
- Condensation: High humidity and cold surfaces leading to moisture buildup.
Signs You Need Waterproofing
- Water stains or efflorescence (white powdery residue) on walls or floors
- Musty odors indicating mold or mildew
- Peeling paint, warped wood, or rusted metal fixtures
- Visible puddles or damp spots after rain
- Cracks in foundation walls or floor slabs
Methods of Basement Waterproofing: Pros, Cons, and Suitability
1. Interior Sealants and Waterproofing Paint
Interior sealants are the most accessible option for DIYers, involving the application of waterproofing paint or masonry sealant to basement walls and floors.
- Pros: Easy to apply; affordable; provides a short-term moisture barrier.
- Cons: Doesn’t address the source of water; limited effectiveness for active leaks or hydrostatic pressure.
- Best for: Minor dampness or as a temporary solution before a larger project.
2. Exterior Waterproofing Membranes
This involves excavating soil around the foundation and applying a waterproof membrane, sometimes combined with a drainage board.
- Pros: Addresses water before it enters the basement; long-lasting; highly effective for persistent leaks.
- Cons: Expensive; labor-intensive; may require landscaping repairs.
- Best for: Chronic seepage, older homes, or when finishing a basement.
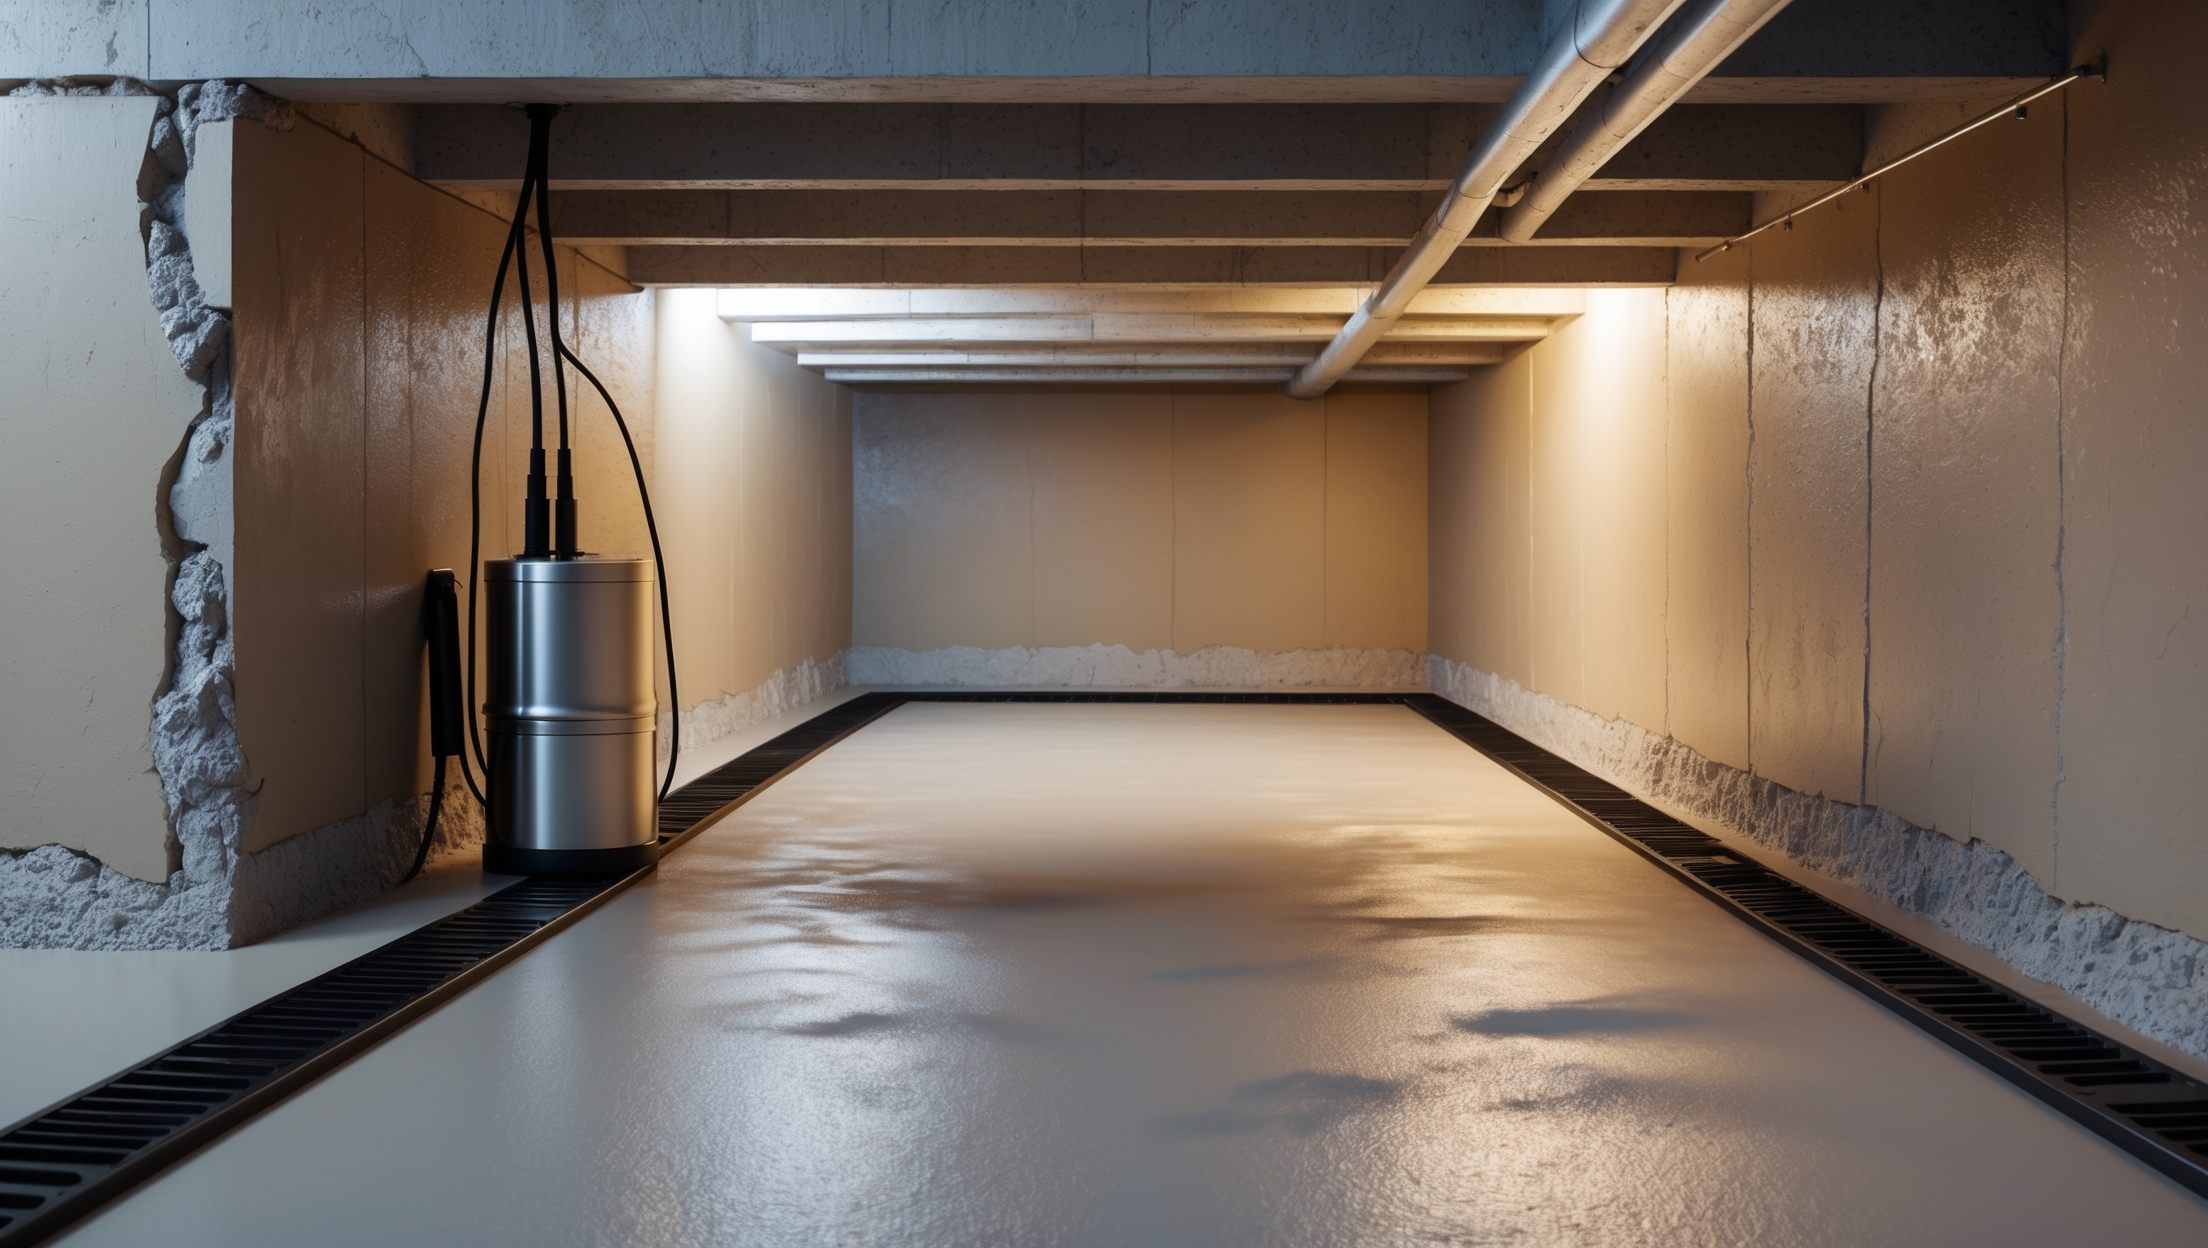
3. Interior Drainage Systems (French Drains & Sump Pumps)
This method channels water from inside the basement to a sump pit, where a pump expels it away from the foundation.
- Pros: Effective for managing hydrostatic pressure; can be installed without exterior excavation.
- Cons: Doesn’t stop water at the source; requires ongoing maintenance (sump pump).
- Best for: Basements with regular water intrusion or high water tables.
4. Exterior Drainage Improvements
Improving grading, extending downspouts, and installing French drains around the perimeter of your home.
- Pros: Cost-effective; reduces surface water issues; can often be combined with other methods.
- Cons: May not resolve groundwater or hydrostatic pressure problems.
- Best for: Homes with surface water pooling or poorly directed runoff.
5. Crack Injections
Epoxy or polyurethane injections into foundation cracks to seal and reinforce them.
- Pros: Quick fix for specific leaks; minimally invasive.
- Cons: May not address underlying structural issues; not a solution for widespread moisture.
- Best for: Isolated cracks or leaks in poured concrete foundations.
Basement Waterproofing Cost Breakdown
Factors Affecting the Cost
- Foundation type (poured concrete, block, stone, etc.)
- Severity and source of moisture
- Square footage and accessibility
- Local labor rates
- Choice of materials and method
Typical Cost Ranges by Method
- Interior sealants: $3–$7 per square foot
- Exterior membrane waterproofing: $8,000–$18,000 for a typical home
- Interior French drain and sump pump: $2,500–$8,000
- Exterior grading and drainage: $1,000–$5,000
- Crack injection: $400–$1,200 per crack
Note: Costs can vary widely. Get at least three itemized quotes and always ask for references and warranties.
Budgeting Tips for Homeowners
- Prioritize repairs based on severity and frequency of water intrusion.
- Invest in professional inspections for persistent or widespread issues.
- Factor in the value of preventing future damage—waterproofing often pays for itself in avoided repairs.
- Consider phased approaches: start with drainage improvements, then address foundation if necessary.
- Check for potential insurance discounts after professional waterproofing.
Step-by-Step: Planning and Executing Basement Waterproofing
1. Inspection and Diagnosis
Start with a thorough inspection of both the interior and exterior. Document all signs of moisture, including stains, odors, and visible leaks. Check gutters, downspouts, grading, and any nearby water sources. If you’re unsure, consult a waterproofing expert for a professional assessment.
2. Selecting Your Waterproofing Strategy
Match the solution to the problem. For surface water, exterior drainage may suffice. For groundwater or persistent leaks, combine interior and exterior methods. For minor seepage, interior sealants can buy time while you budget for a permanent fix.
3. Gathering Materials and Professional Help
- Interior jobs: masonry waterproofing paint, crack injection kits, dehumidifiers
- Exterior jobs: waterproof membranes, drainage boards, gravel, pipes, heavy equipment for excavation
- Interior drainage: perforated pipes, sump pump, sump basin, concrete saw, gravel
For anything beyond basic sealants or crack repairs, strongly consider hiring a licensed contractor with relevant experience and insurance.
4. Implementation
- Interior sealing: Clean and dry surfaces thoroughly. Apply sealant as directed, ensuring full coverage and adequate curing time.
- Exterior membrane: Excavate around the foundation, clean the wall, apply membrane and drainage board, backfill with gravel, and restore landscaping.
- Interior drainage: Saw-cut and remove a channel in the slab perimeter, lay perforated pipe in gravel, direct water to sump basin, connect and test the sump pump, and patch the concrete.
- Drainage improvements: Regrade soil, install extensions on downspouts, add French drains as needed.
- Crack injections: Clean cracks, inject material per kit instructions, monitor for further movement.
5. Post-Installation Testing and Inspection
After waterproofing, test your work by running a garden hose around the foundation or waiting for the next heavy rain. Inspect for new leaks, check sump pump operation, and look for signs of moisture on walls and floors.
Essential Maintenance for a Dry Basement
Routine Checks
- Inspect gutters and downspouts every spring and fall; clear debris promptly.
- Check grading annually and regrade soil if water pools near the foundation.
- Run dehumidifiers when humidity exceeds 60%.
- Test sump pumps quarterly—pour water into the pit to trigger the pump and observe discharge.
- Look for new cracks or signs of efflorescence every few months.
Sump Pump Maintenance
- Clean the sump pit annually to remove silt and debris.
- Test the backup battery or generator if installed.
- Replace sump pumps every 7–10 years, or as soon as performance declines.
Interior Air Quality
- Use a hygrometer to monitor humidity.
- Seal foundation gaps with caulk or expanding foam.
- Address musty odors promptly—investigate and remediate any mold growth.
Compliance, Permits, and Insurance Considerations
Permitting Requirements
Most jurisdictions require permits for major waterproofing projects, especially those involving excavation, foundation work, or sump pump installation. Check with your local building department for specific regulations and required inspections.
Insurance Implications
Standard homeowners insurance rarely covers flooding or long-term water intrusion. After waterproofing, inquire about policy adjustments or discounts for improved protection. Consider adding a sump pump rider or flood insurance if you’re in a high-risk area.
Choosing Licensed Professionals
- Verify contractor licensing and bonding.
- Ask for proof of insurance (liability and workers’ compensation).
- Request written warranties and clearly defined scopes of work.
Frequently Overlooked Basement Waterproofing Mistakes
- Ignoring exterior drainage—focusing only on interior solutions
- Using paint or sealants as a substitute for real repairs
- Neglecting regular sump pump testing
- Blocking wall vents or failing to ventilate the space
- Underestimating the impact of landscaping or hardscaping changes
Conclusion: Investing in a Dry, Healthy Basement
Basement waterproofing is more than a one-time fix—it’s a holistic strategy that protects your home’s structure, value, and the health of everyone living under your roof. Whether you’re battling minor dampness or confronting chronic flooding, understanding the causes and solutions is critical to achieving long-term results. The investment you make today can prevent thousands of dollars in future repairs, mold remediation, or even total loss of finished spaces. Start by accurately diagnosing the problem, choosing the right combination of methods, and budgeting for professional help where needed. Don’t overlook ongoing maintenance—regular checks, sump pump testing, and prompt attention to new issues are your best defense against water damage. With the right approach, your basement can be transformed from a damp liability into a safe, functional, and valuable part of your home. Prioritize waterproofing not only for peace of mind, but as a foundational step in any serious home improvement plan.
How long does it usually take to see real results after applying an interior sealant or waterproofing paint, and what should I do if the musty smell or dampness keeps coming back after treatment?
You can typically see visible results from interior sealants or waterproofing paint within a day or two after application, once everything dries. However, if musty smells or dampness persist, it may indicate a deeper moisture problem that the sealant alone can’t fix. In that case, check for issues like leaks, poor drainage, or high humidity, and consider consulting a professional for further assessment and solutions.
Can you give a ballpark timeframe for how long the common waterproofing methods usually last before needing maintenance or reapplication, especially in areas with harsh weather conditions?
Most common basement waterproofing methods like exterior membranes or interior sealants typically last anywhere from 5 to 10 years before maintenance is required, though high-quality exterior systems can last 15 years or more. In regions with harsh weather, you might need to inspect and maintain these systems more frequently, around every 3 to 5 years, to ensure effectiveness and address any early signs of wear or leaks.
Could you provide more details on cost breakdowns for each waterproofing method? I’m trying to budget for a solution and need to weigh affordability versus long-term effectiveness for my unfinished basement.
Certainly! Interior sealants and waterproofing paint are usually the most affordable, ranging from $300 to $800, but they’re best for minor dampness and aren’t a long-term fix. Interior drainage systems like French drains typically cost $1,500 to $5,000 and are effective for ongoing water issues. Exterior waterproofing, the most comprehensive option, can range from $5,000 to $15,000 because it involves excavation and membrane installation. Consider both your budget and how severe your basement’s moisture problem is when choosing a method.
The article talks about ground water and hydrostatic pressure forcing water into basements. How can I tell if my leaks are coming from groundwater versus surface water, and does that change which waterproofing method I should use?
To tell the difference, check when leaks occur—groundwater-related leaks usually happen after prolonged rain or snowmelt, often at wall-floor joints or through cracks, while surface water leaks tend to show up quickly during heavy rain, often near basement windows or doors. If groundwater is the cause, you may need solutions like interior drains or sump pumps. For surface water, improving exterior drainage, grading, or gutters might be enough. Accurately identifying the source helps you pick the right waterproofing method.
For a busy family that stores a lot in the basement, what kind of ongoing maintenance is absolutely essential to prevent small moisture problems from turning into expensive repairs later?
For a busy family with lots stored in the basement, regularly check for any signs of dampness, mold, or water stains—especially after heavy rain. Make sure sump pumps and dehumidifiers are functioning properly. Keep storage items off the floor on shelves or pallets, and ensure gutters and downspouts outside direct water away from the foundation. Inspect basement walls and floors at least twice a year for cracks, and promptly seal any you find.
I noticed you mentioned condensation as a source of basement moisture. Are there specific types of dehumidifiers or ventilation systems you recommend for dealing with high humidity in a finished basement?
For finished basements with high humidity, a whole-house or basement-specific dehumidifier is ideal, as they’re designed for larger spaces and continuous use. Look for Energy Star-rated units with a built-in pump or drain hose for convenience. In terms of ventilation, installing an energy recovery ventilator (ERV) or heat recovery ventilator (HRV) can help exchange humid air for fresh, drier air without major energy loss. Both options work well to control condensation and maintain a comfortable environment.
Regarding interior sealants and waterproofing paint, how long do these solutions typically last before reapplication is needed? Are there specific situations where you would not recommend using interior sealants as a standalone method?
Interior sealants and waterproofing paint usually last 1 to 5 years before needing reapplication, depending on the product and basement conditions. These methods are not recommended as a standalone solution if you have ongoing water leaks, hydrostatic pressure, or structural cracks. They’re best for minor dampness, not for fixing serious or recurring water intrusion issues.