Introduction: Why Home Drainage Demands Your Attention
Proper home drainage is one of the most overlooked aspects of home improvement, yet it plays a critical role in protecting your property from costly water damage. Whether you’re dealing with pooling water near your foundation, damp basements, or soggy landscaping, ineffective drainage can lead to structural issues, mold growth, and ruined landscaping—sometimes within a single season. Addressing drainage isn’t just about digging a few trenches; it requires a thoughtful approach, smart budgeting, and ongoing maintenance. In this comprehensive guide, we break down the real costs of various home drainage solutions, highlight common installation errors that can sabotage your project, and provide actionable maintenance tips. Whether you’re a DIY enthusiast or considering hiring a pro, understanding the details of drainage will help you make informed decisions, avoid expensive mistakes, and keep your home safe and dry year-round.
Understanding the Basics: Types of Home Drainage Systems
Surface Drainage
Surface drainage refers to systems designed to capture and redirect water flowing across the ground. Typical solutions include swales, channel drains, and grading adjustments. These systems prevent water from pooling around your home or damaging landscaping.
- Swales: Shallow, sloped ditches lined with grass or rocks to channel water away.
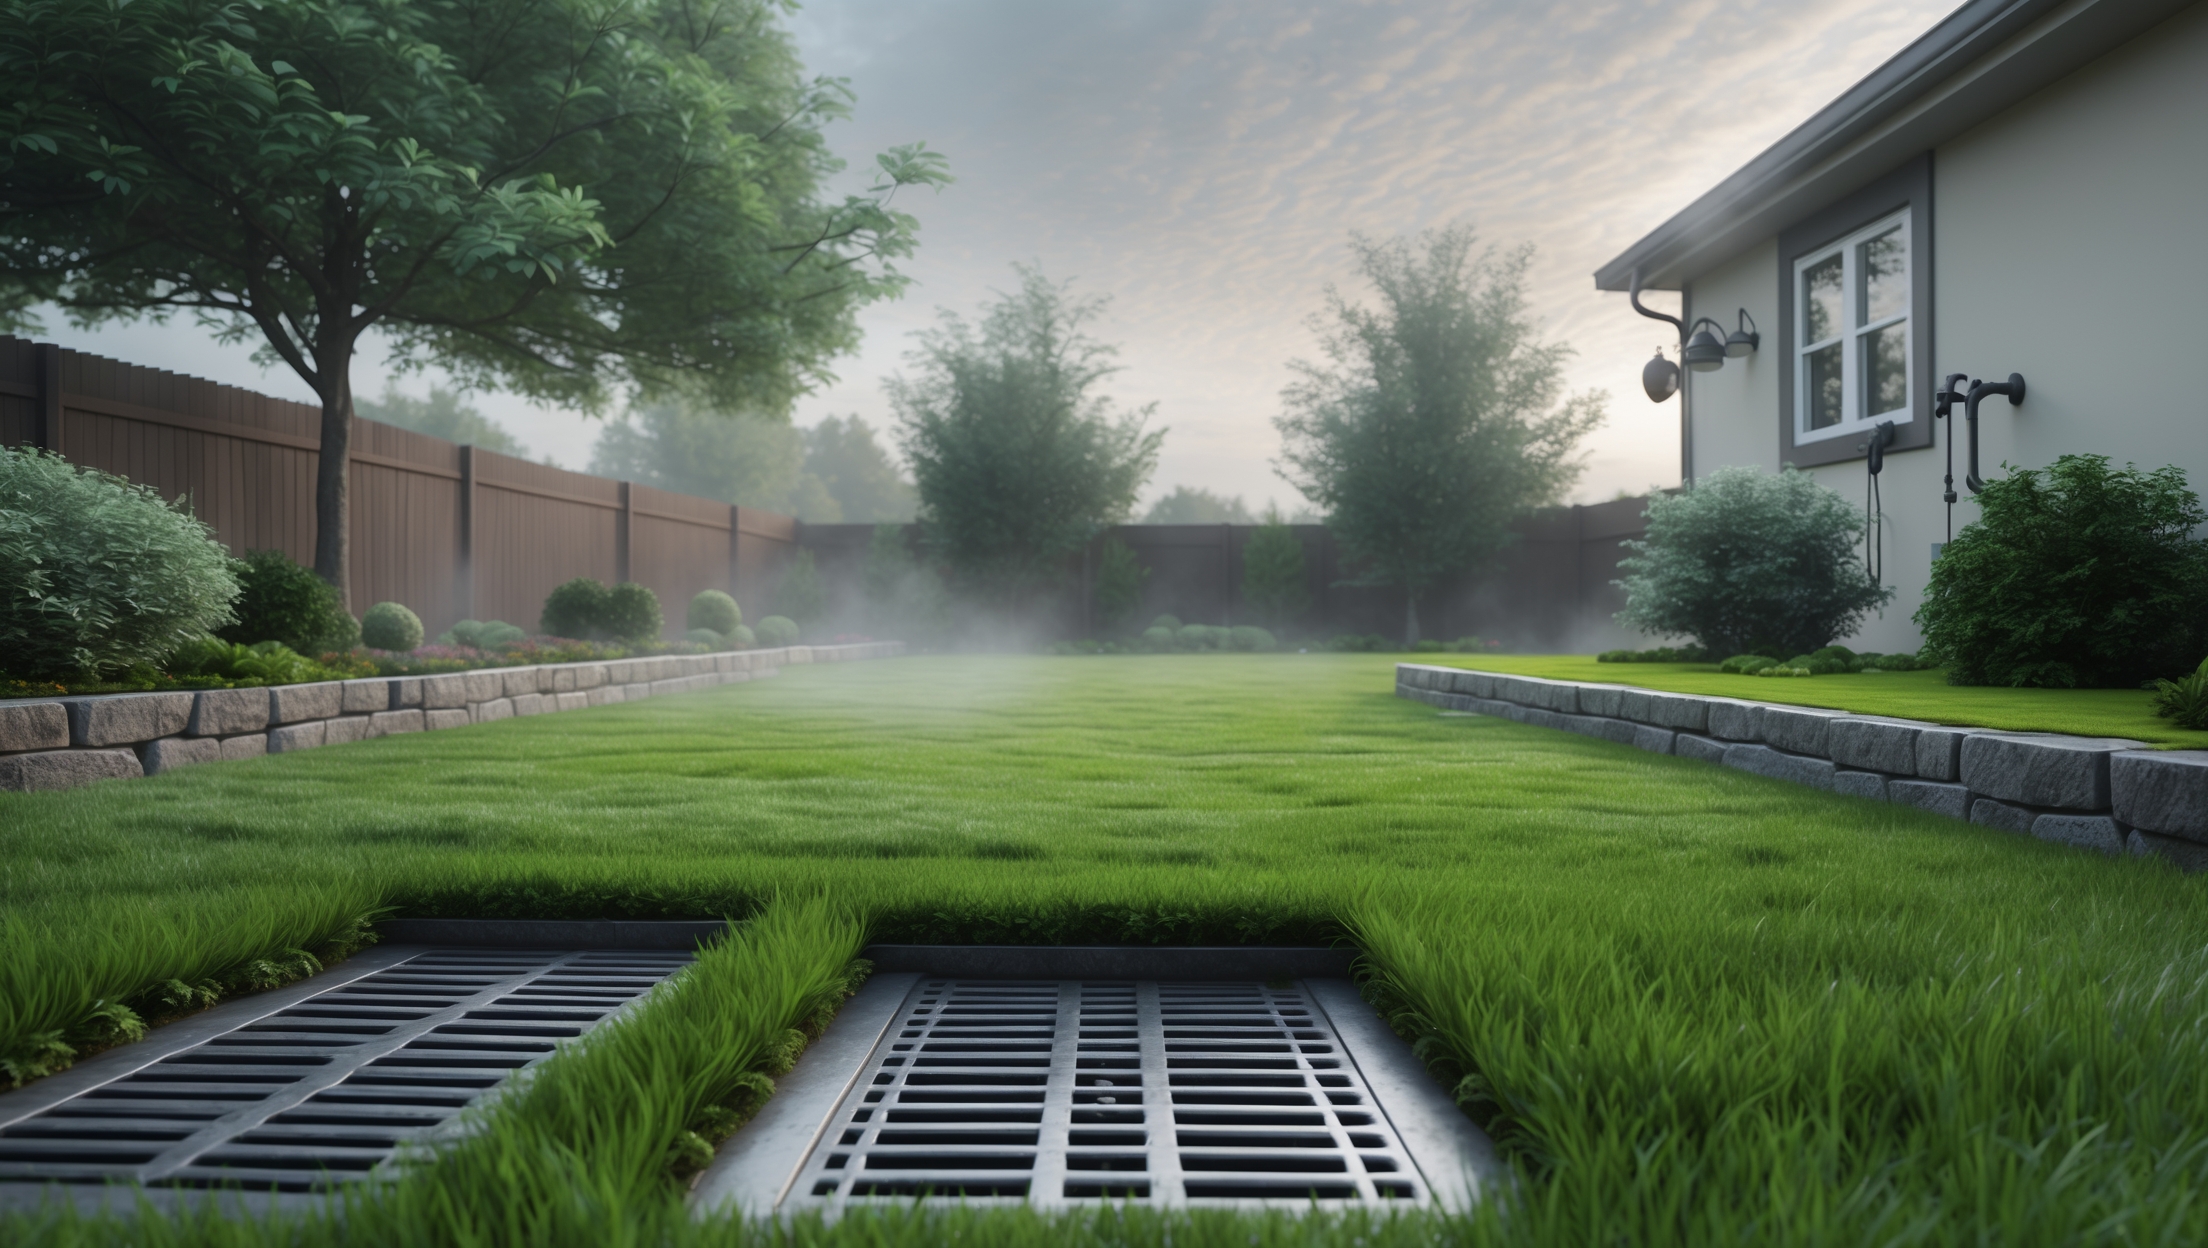
- Channel Drains: Grated trenches installed in driveways, patios, or walkways to intercept runoff.
- Grading: Adjusting soil levels to ensure water flows away from the foundation.
Subsurface Drainage
Subsurface drainage systems handle water that has soaked into the ground. These solutions are essential for homes with clay soils, high water tables, or persistent soggy spots. The most common options include French drains and dry wells.
- French Drains: Perforated pipes buried in gravel trenches that collect and redirect groundwater.
- Dry Wells: Underground chambers that temporarily hold excess water until it can percolate into the soil.
- Sump Pumps: Installed in basements or crawl spaces to remove water accumulating below grade.
Cost Breakdown: What to Expect for Common Drainage Solutions
1. Swales and Grading
- DIY Cost: $200–$1,000 (mostly labor, minimal materials)
- Professional Cost: $1,000–$3,000 (includes design and heavy equipment)
Costs depend on yard size, soil conditions, and the amount of earth to be moved. Grading may require renting equipment or hiring a specialist for large or steep lots.
2. Channel Drains
- DIY Cost: $30–$80 per linear foot (materials, saw rental, gravel, concrete)
- Professional Cost: $60–$150 per linear foot
Installation involves cutting existing concrete and ensuring correct slope toward the outflow. Mistakes here can lead to chronic clogs or standing water.
3. French Drains
- DIY Cost: $20–$40 per linear foot (pipe, gravel, fabric, trenching tools)
- Professional Cost: $40–$100 per linear foot
Costs rise with deeper or more complex installations, such as those near foundations or under driveways. DIYers save on labor but face significant digging and debris disposal.
4. Dry Wells
- DIY Cost: $300–$1,000 (chamber, gravel, tools, soil disposal)
- Professional Cost: $1,000–$3,000
Dry wells are often paired with French drains or gutter extensions. Proper sizing and location are essential for effectiveness.
5. Sump Pumps
- DIY Cost: $150–$400 (pump kit, pit liner, piping, basic tools)
- Professional Cost: $500–$2,000 (includes electrical work, pit excavation, backup systems)
Don’t forget to budget for annual maintenance and potential backup power solutions, especially in flood-prone areas.
Beginner Mistakes to Avoid in Drainage Projects
1. Ignoring Local Regulations and Permits
Many municipalities have rules about redirecting stormwater or altering grading. Failing to check local codes can result in fines or forced removal of your project. Always consult local authorities before starting any significant drainage work.
2. Underestimating Water Volume
A common error is sizing the drainage system too small. Consider both average rainfall and extreme weather events. Use online calculators or consult with a drainage engineer to determine the right size for pipes, wells, and swales.
3. Poor Slope and Placement
Drains without proper slope (generally 1% minimum—1 foot drop per 100 feet) will not carry water efficiently. Place outflows at least 10 feet from the foundation, and never direct water toward a neighbor’s property.
4. Skipping Filter Fabric or Gravel
Omitting landscape fabric around French drains or insufficient gravel leads to pipe clogging and system failure within a few seasons. Always follow best practices for layering materials.
5. Connecting to the Wrong Outfall
Never connect drainage systems directly to the sewer line or septic system. Use designated stormwater outfalls or daylight drains to avoid contamination and fines.
6. Forgetting Maintenance Access
Install cleanouts or access points at logical intervals. Otherwise, clearing blockages becomes expensive and invasive.
Step-by-Step Guide: Installing a Simple French Drain
Tools & Materials Needed
- Shovel or trenching tool
- Perforated drainage pipe (4-inch typical for yards)
- Landscape fabric
- Washed gravel (¾-inch)
- Level and tape measure
- Saw (for cutting pipe)
- Wheelbarrow (for moving dirt and gravel)
- Gloves, safety glasses, sturdy footwear
Installation Steps
- Plan the Route: Identify the wet area and where you want the water to exit. Mark a path that slopes away from structures.
- Dig the Trench: Aim for 6–12 inches wide and 18–24 inches deep. Check for utility lines before digging.
- Line with Fabric: Lay landscape fabric in the trench, leaving extra on both sides to fold over the top later.
- Add Gravel Base: Pour in 2–3 inches of washed gravel and level.
- Lay the Pipe: Place the perforated pipe with holes facing down. Check slope—at least a 1% drop along the length.
- Backfill with Gravel: Cover pipe with gravel to within a few inches of the surface.
- Wrap Fabric: Fold fabric over the top of the gravel to prevent soil intrusion.
- Top Off: Fill the rest of the trench with topsoil and reseed or sod as needed.
- Test the System: Run water through the area to ensure flow and proper outflow.
Maintenance Best Practices: Keeping Your Drainage System Working
Seasonal Checks
Inspect all visible drains, grates, and outfalls at least twice a year—best in early spring and late fall. Remove leaves, sediment, and debris that accumulate over the seasons. For French drains, look for signs of surface pooling or soggy areas, which may indicate clogs below ground.
Cleaning and Flushing
- Channel Drains: Remove grates and scoop out debris. Flush with a garden hose to check for flow.
- French Drains: Use cleanouts to flush pipes with water. If no cleanouts exist, consider adding them for future maintenance.
- Sump Pumps: Test pump operation before the rainy season. Clean the pit and check for obstructions to the float switch.
Addressing Common Problems
- Persistent Clogs: If flushing doesn’t clear a blockage, use a sewer snake or, for severe cases, call a professional with hydro-jetting equipment.
- Collapsed Pipes: Symptoms include sudden loss of flow or visible sinkholes. Excavation and pipe replacement may be necessary.
- Pest Intrusion: Install mesh screens on outflows to prevent rodents or insects from entering pipes.
Landscaping and Erosion Control
Keep plants and roots away from drain lines and outflows. Mulch and ground covers help reduce erosion around swales and outfalls. Avoid heavy vehicles or equipment over buried pipes to prevent crushing.
Case Study: Solving Chronic Backyard Flooding
Background: A suburban homeowner struggled with a waterlogged backyard every spring, resulting in muddy patches and mosquito infestations.
Assessment: Site inspection revealed a low spot near the fence line with no natural outflow. The homeowner initially tried adding topsoil and reseeding, but water continued to pool.
Solution: A 50-foot French drain was installed, sloping toward a dry well at the yard’s lowest point. The project cost $2,400 (professional install), including materials, labor, and dry well construction. The contractor also regraded a small section of lawn to improve surface runoff.
Outcome: After two seasons, the yard remained dry even after heavy rains. Routine checks and annual flushing kept the system clear. The homeowner noted improved grass growth and fewer insect problems.
Expert Tips for Choosing the Right Drainage Solution
- Assess Your Site: Walk your property during or after rain to observe water flow patterns. Photograph problem areas for planning.
- Start with Simple Fixes: Sometimes extending downspouts or minor grading can resolve issues without major excavation.
- Consider Professional Advice: Large or complex drainage problems may require a civil engineer or landscape drainage specialist.
- Think Long-Term: Select materials and designs with longevity in mind. Cheaper pipes or shortcuts can cost more in repairs later.
- Plan for Maintenance: Any system, no matter how well-installed, will need periodic checks and cleaning.
Conclusion: Protecting Your Home with Smart Drainage Planning
Home drainage improvement is both a science and an art. While it might be tempting to overlook this aspect of home care, the risks of inaction are significant: foundation damage, basement flooding, ruined landscaping, and even health hazards from mold or pests. By understanding the types of drainage systems and their real costs, you can budget effectively and avoid the sticker shock that often comes with emergency repairs. More importantly, steering clear of common beginner mistakes—like improper sizing, poor slope, or neglecting maintenance—will ensure your investment pays off for years to come. Remember, even a simple project like a French drain or regrading effort can make a dramatic difference in your property’s health and value. For larger problems or unfamiliar challenges, don’t hesitate to consult a professional. Thorough planning, careful installation, and regular upkeep are the keys to a dry, safe, and beautiful home environment. By taking action now, you’re not just fixing a problem—you’re safeguarding your biggest asset and improving your everyday quality of life.
You mentioned that grading is important to ensure water flows away from the foundation. If my yard already slopes a bit but I still get pooling near the basement, should I focus on regrading or consider another solution like a French drain?
If your yard already has a slope but you’re still seeing water pool near the basement, regrading may not be enough on its own. In this case, adding a French drain could be very effective, as it helps redirect water away from problem areas. You might also want to check for compacted soil or landscaping features that could block drainage. Combining solutions often gives the best results.
I’m planning to install a French drain myself, but I’m not sure how deep the trench needs to be if I have really clay-heavy soil. Is there a general rule for depth or does it depend on specific yard conditions?
For clay-heavy soil, a French drain trench is typically dug 18 to 24 inches deep, but the exact depth can vary depending on your yard’s drainage issues and the slope you need for water to flow. The key is to go below the topsoil and into the clay layer, ensuring the drain captures surface and subsurface water. If water pools deeply, you might need to go a bit deeper, but proper slope (about 1 inch per 8 feet) is just as important.
You mention that improper grading can lead to water pooling around the foundation. Can you explain how a homeowner can tell if their grading is the issue and what kind of DIY adjustments are realistic for a beginner?
Homeowners can check for grading issues by looking for visible slopes directing water toward the house or noticing persistent puddles near the foundation after rain. Walk around your home and see if the soil slopes away—a good rule is a 5% grade, about 6 inches of drop over 10 feet. For DIY fixes, you can add soil to low spots near the foundation and tamp it down, ensuring the new slope guides water away. Avoid piling soil against siding or covering vents.
I noticed you mentioned that common errors during installation can sabotage drainage projects. Can you elaborate on what some of these mistakes are and how to avoid them, especially for someone thinking of attempting a DIY solution?
Certainly! Common mistakes in DIY drainage projects include improper slope (water won’t flow correctly), using the wrong type or size of pipe, and failing to add a gravel base for French drains. Some also forget to include filter fabric, which leads to clogs. You can avoid these errors by carefully planning your layout, checking slope with a level, using appropriate materials, and thoroughly backfilling with gravel and fabric. Always research local codes before starting.
I’m new to landscaping and noticed you mentioned swales and grading as surface drainage options. How do I know when grading alone is enough compared to needing to dig a swale, especially if my soil is pretty clay-heavy?
If your yard has good slope away from the house and water doesn’t pool after rain, grading alone may be enough—even with clay-heavy soil. But if water tends to collect or run off too slowly, a swale helps channel excess water more efficiently. Clay soil drains slowly, so swales are often recommended where grading can’t move water fast enough or if you notice soggy spots lingering after storms.
In terms of ongoing maintenance, how often should systems like swales or dry wells be checked or cleaned out to stay effective, especially in areas with a lot of rain or clay soil?
Swales and dry wells in rainy or clay-heavy areas should be checked at least twice a year, ideally before and after the rainy season. After major storms, inspect for blockages, buildup, or erosion. Cleaning out debris and sediment at these times will help maintain flow and prevent backup. If you notice water pooling or slow drainage, check your system sooner.
I noticed the article talks about common installation errors that can sabotage drainage projects. What are the most frequent mistakes you see small business owners make when trying to DIY surface drainage, and how can we avoid them?
Some common mistakes small business owners make with DIY surface drainage include installing pipes without the proper slope, using the wrong materials, or neglecting to check local water flow patterns. Poor grading and blocking natural water exits are also frequent issues. To avoid these, plan the drainage layout carefully, ensure pipes slope at least 1-2% away from buildings, use durable materials, and observe how water moves on your property after rainfall before starting any work.
I noticed the article mentioned French drains and dry wells for subsurface drainage, but how do I determine which one is more suitable for a small business property with both landscaped and paved areas?
To decide between a French drain and a dry well, consider the property’s layout and drainage needs. French drains are ideal if you need to redirect water away from paved or landscaped areas with excess surface runoff. Dry wells work best for collecting and dispersing water from downspouts or specific points. Assess where water tends to pool and whether you need to move water across the property or simply disperse it underground.
For a business owner on a tight budget, which of these drainage solutions usually offers the best balance between upfront cost and long-term effectiveness? I’m trying to advise my clients but want to avoid recommending something too expensive they might not need.
For business owners watching their budgets, French drains or properly graded surface drainage tend to offer a good balance of affordability and long-term reliability. These options address many common water issues without the higher costs of full-scale sump pump systems or complex underground piping, as long as the property’s needs don’t demand heavy-duty solutions. Proper installation and periodic maintenance are key to making them last and perform well over time.
The article mentions that improper installation can sabotage drainage projects. What are some common mistakes you see when it comes to grading adjustments, and how can I avoid them in my own landscaping updates?
Common grading mistakes include sloping soil toward the house instead of away, not allowing for enough slope (generally 1 inch per foot for at least 6 feet), and using materials that compact poorly, leading to uneven settling. To avoid these issues, always ensure the soil slopes away from your foundation, use high-quality fill dirt, and compact it well as you go. Double-check your slope with a level or string line before finishing up.
How often do you recommend inspecting surface drainage components like swales and channel drains to prevent clogs or damage? Are there specific signs of trouble business owners should watch for before it leads to bigger problems?
Inspecting surface drainage components such as swales and channel drains every three to six months is a good routine, especially after heavy rains. Business owners should look for signs like pooling water, slow drainage, visible debris accumulation, or erosion around drains. Any unusual odors or water backing up near entrances can also indicate developing issues that need prompt attention.
If my yard only gets soggy after really heavy rains, would a surface solution like grading be enough, or should I consider a subsurface option like a dry well? How do I decide between the two?
If your yard only becomes soggy after very heavy rains and dries out quickly otherwise, grading the surface to direct water away from your home may be enough. However, if water tends to pool in certain areas or remains soggy for days, a subsurface option like a dry well can be more effective. Consider how quickly your yard drains after rain and whether water frequently sits in low spots—persistent sogginess suggests you may need both grading and a subsurface solution.
My backyard gets soggy every spring, even after I installed a basic surface drain. Are there maintenance tips for these systems or a sign that I need to upgrade to something like a dry well?
If your backyard remains soggy despite having a surface drain, check for clogs, debris, or blocked grates that could be limiting water flow. Regularly cleaning the drain and ensuring proper grading around it helps. Persistent sogginess may mean the surface drain isn’t enough for your soil or water volume, so upgrading to a dry well or French drain might be necessary to handle excess water more effectively.
After setting up a dry well for drainage, how often should it be checked or maintained to prevent it from filling up with debris or clogging? Are there any signs to look out for that indicate maintenance is overdue?
A dry well should be inspected at least once or twice a year, especially after heavy storms. Look for slow drainage, pooling water around the well, or any overflow—these are signs that maintenance is overdue. During checks, remove any leaves, sediment, or debris from the inlet and surrounding area to keep the system working efficiently.
What are some common installation errors specific to channel drains in driveways or patios? I’m considering a DIY approach, but I want to avoid any mistakes that could undermine the system’s effectiveness right from the start.
Some common installation errors with channel drains in driveways or patios include improper slope (which causes water pooling), setting the drain too high or low relative to the surface, not using enough concrete to secure the channel, and poor alignment leading to tripping hazards or ineffective water flow. It’s also important to connect the drain securely to your drainage system and ensure debris screens are fitted to prevent clogging. Taking extra care with leveling and bedding will make a big difference in long-term performance.
Our basement has been a little damp recently, and I’m wondering if a French drain or dry well would make more sense. Do you have any advice for diagnosing the problem so I pick the right solution, and should I try fixing it myself or go straight to a professional?
To choose between a French drain and a dry well, first pinpoint where the moisture is coming in—check for water stains, cracks, or pooling after rain. If dampness is from water seeping near the foundation, a French drain helps redirect it. If it’s more about pooling in the yard, a dry well may work. DIY is possible for simple issues, but if you see persistent dampness or structural concerns, consulting a professional is safer and often more effective.
Could you give more detail on how much time a typical homeowner should expect to spend maintaining a French drain or a dry well each year? I’m curious if one requires a lot more upkeep than the other.
For a typical homeowner, maintaining a French drain usually involves checking for clogs and clearing debris 1–2 times a year, which can take about 1–2 hours each time. A dry well generally needs less attention, just an inspection and debris removal once a year, usually under an hour. Overall, French drains tend to require a bit more regular upkeep than dry wells.
Could you explain more about how grading compares to installing a French drain, both in terms of cost and ongoing maintenance needs? I am trying to decide which would work best for my sloped backyard.
Grading involves reshaping the soil to direct water away from your home, which is generally less expensive upfront than installing a French drain. Grading typically costs less in labor and materials and requires occasional checks for soil settling or erosion. French drains, on the other hand, cost more due to materials like gravel and piping, plus installation. For maintenance, French drains need periodic clearing to prevent clogging, while grading mainly needs monitoring after heavy rain. For a sloped backyard, grading is often sufficient unless water pooling persists, in which case a French drain may be needed.
Once a French drain is in place, what kind of maintenance checks should I schedule each year to make sure it keeps working properly and does not get clogged or damaged?
To keep your French drain working well, inspect it at least once or twice a year, especially after heavy rains. Check the drain outlets for debris or blockages, and make sure water flows freely. Remove leaves, dirt, or sediment that may have collected around the surface inlet. If the drain is covered by gravel, rake it to keep it clear. Also, check for any signs of sinking or damage to the pipe or surrounding area.
In your section on common installation errors, do you have any specific examples of mistakes to avoid when grading the soil? I’ve read conflicting advice on how much slope is actually needed near the foundation.
When grading soil near your foundation, a common mistake is not providing enough slope for water to drain away. The general guideline is to slope the soil at least 6 inches over the first 10 feet away from the foundation. Another error is allowing the soil to settle or erode, which can reduce the effectiveness of the slope over time. Make sure to compact the soil well and check the grade periodically to maintain proper drainage.
You mentioned that grading is important for surface drainage, but how can I tell if my yard’s grading needs to be fixed before installing anything like a French drain?
To check if your yard’s grading needs adjustment, observe how water behaves after heavy rain. If water pools near your home’s foundation or doesn’t flow away from your house, the grading likely slopes incorrectly. Ideally, the ground should slope away from your home at least 6 inches over 10 feet. You can use a long level and a tape measure to check the slope. Fixing grading issues first will make any drainage solutions more effective.
I noticed you mentioned French drains as a subsurface drainage option. In your experience, how much maintenance do these typically require compared to surface solutions like swales or channel drains, especially in areas with lots of tree roots?
French drains generally need more maintenance than surface options like swales or channel drains, especially in areas with many tree roots. Over time, roots can infiltrate the gravel and perforated pipe, causing clogs or blockages. This means you may need to inspect and flush the system every year or two, and occasionally clear out roots. In contrast, surface drains are easier to check and clear of debris but can get blocked by leaves more frequently after storms.
I noticed the article mentions a cost breakdown, but I’m on a tight budget and wondering which type of home drainage system generally offers the lowest long-term maintenance expenses. Any insight on which options are most affordable to maintain year after year?
French drains typically have lower long-term maintenance costs compared to more complex systems like sump pumps or surface drainage with catch basins. Once installed properly, French drains just need periodic checks for clogs or debris. Basic surface grading may also be cost-effective, as it relies mostly on the slope of the land rather than mechanical parts that can fail or require frequent servicing.
If my yard is already showing signs of soggy areas near the foundation, is it better to address the cause with subsurface solutions first, or can surface drainage adjustments sometimes resolve the problem on their own?
When you notice soggy areas near your foundation, it’s usually best to start with surface drainage adjustments, like regrading soil or extending downspouts, since these are less invasive and can often resolve the issue. However, if these measures don’t fix the problem, or if water still pools after heavy rain, subsurface solutions like French drains may be necessary to protect your foundation.
Curious about budgeting: for someone mostly handling things DIY, what are the typical hidden costs or surprises that come up with installing surface drainage versus subsurface systems like French drains?
When installing surface drainage systems DIY, hidden costs often include renting equipment for grading, extra soil or gravel, and replacing any damaged landscaping. For subsurface systems like French drains, surprises can be the price of trenching tools, hauling away lots of soil, buying perforated pipes and geotextile fabric, and dealing with unexpected obstacles like tree roots or buried utilities. Planning for these extras can help keep your project on budget.
When it comes to French drains and dry wells for subsurface drainage, how do you decide which option is better for a property with really dense clay soil? Is one typically more effective or longer-lasting than the other?
For dense clay soil, French drains often struggle because water doesn’t flow easily through clay, making it hard for the drain to collect and carry water away. Dry wells can also have trouble absorbing water in clay, but they sometimes work if enough capacity and rock are used. In most cases, improving surface drainage or combining these systems with soil amendments may work better. French drains might require more maintenance, while dry wells risk backing up if not sized carefully. A drainage professional can help assess which would be more effective long-term for your specific site.
You mentioned that grading is one way to direct water away from the foundation. How do I know if my yard needs grading, and is it something a homeowner can do themselves or does it require hiring a professional?
To determine if your yard needs grading, look for standing water after rain, damp spots near your foundation, or visible slopes directing water toward your house. Small grading projects, like filling low spots with soil, can often be done by homeowners with basic tools. However, for larger areas or persistent drainage issues, hiring a professional is safer to ensure the slope is done correctly and to avoid damaging your foundation.
I’m curious about grading as a drainage solution. How do I know if my yard’s grading is actually causing water to pool near my foundation, and is it realistic for a first-time DIYer to fix grading themselves or should I hire someone?
To check if your yard’s grading is causing water to pool, observe whether water flows away from your foundation after rain or if puddles form near your house. Ideally, the ground should slope away from your home by about 6 inches over the first 10 feet. Small grading fixes, like adding soil to low spots, can be DIY, but larger or more complex slopes usually require professional help to avoid future drainage or foundation problems.
You mentioned that grading is important for surface drainage. Are there any signs I can look for to know if my yard’s grading is causing water to pool near my foundation before any major damage happens?
Absolutely, there are some warning signs to help you spot poor grading before serious damage occurs. Watch for water pooling or standing puddles near your foundation after rain, soil that feels consistently soggy, or visible slope directing water toward your house. You might also notice cracks or mildew on your basement walls, or erosion of landscaping close to your home. Addressing these signs early can help prevent costly water damage.
If my backyard only has occasional pooling after heavy rain, would a swale or a dry well be the better long-term solution in terms of both cost and maintenance?
For occasional pooling after heavy rain, a swale is often the better long-term option in terms of both cost and maintenance. Swales are usually less expensive to install and require minimal upkeep compared to dry wells, which can clog over time and need periodic cleaning. Swales also blend naturally into landscaping and handle surface water efficiently.
The article mentions that improper grading is a common error with drainage projects. If my property already has uneven landscaping, what is the best way to assess whether grading alone is enough, or if I need to add a subsurface system like a French drain?
To determine if grading alone will solve your drainage issues, observe your yard after heavy rain. If water consistently pools or flows toward your home despite surface adjustments, grading may not be enough. In these cases, a subsurface system like a French drain could be necessary. Consulting with a drainage professional for an on-site assessment can help you choose the best solution for your specific landscape.
If a home already has a French drain but still experiences basement dampness after heavy rains, what steps should be checked or redone before considering additional drainage solutions?
Start by checking if the French drain is clogged with debris, silt, or roots, and clean it out if needed. Make sure the drain pipes have the correct slope and remain unbroken. Inspect the drain outlet to ensure it’s not blocked or submerged. Also, confirm gutters and downspouts direct water far from the foundation. Sealing basement walls and checking for cracks can also help before considering further drainage upgrades.
What are some common mistakes homeowners might make when trying to handle surface drainage themselves, like with channel drains or grading?
Homeowners often make mistakes like installing channel drains at the wrong slope, which can prevent proper water flow. Another common error is grading the yard incorrectly, causing water to flow toward the house instead of away from it. Failing to account for settling soil or using the wrong materials can also reduce drainage effectiveness. Regular inspection and careful planning can help prevent these issues.
I noticed you mentioned that poor installation can sabotage drainage projects. What are the most common mistakes DIYers make when installing a French drain, and how can I avoid them?
DIYers often make mistakes like not providing enough slope for water to flow, using the wrong type of gravel, skipping the filter fabric, or placing the pipe with holes facing the wrong way. To avoid these, ensure your trench slopes about 1 inch for every 8 feet, use clean, coarse gravel, wrap the drain with filter fabric to prevent clogging, and position the pipe holes downward so water can enter easily.
The article mentions costly water damage resulting from improper drainage. Are there any early warning signs homeowners should look for before committing to full subsurface drainage solutions like French drains or dry wells?
Absolutely, there are early warning signs homeowners can watch for before investing in major drainage solutions. Look out for persistent puddles or soggy patches in your yard after rain, water stains or mildew in your basement, cracks in your foundation, or areas where the soil is eroding near your home’s exterior. These signs suggest drainage issues that, if addressed early, might help you avoid the need for more extensive solutions.
How disruptive is it to install a French drain for someone living in the home during the process? I’m concerned about how long the yard might be torn up and what recovery or landscaping might be needed afterwards.
Installing a French drain can be somewhat disruptive, as it usually involves digging a trench across your yard. The process might take anywhere from a couple of days to a week, depending on the length and complexity. During this time, parts of your yard will be inaccessible and messy. After installation, you’ll likely need to reseed grass or restore landscaping where the trench was dug to help your yard recover.
You listed French drains and dry wells for subsurface water, but what are the typical installation costs for each, especially if I hire a professional versus trying DIY? I’m hoping to budget realistically.
For French drains, professional installation usually ranges from $20 to $50 per linear foot, depending on soil conditions and accessibility. DIY costs can be much lower, around $10 to $20 per foot, mostly for materials. Dry wells installed by a pro often cost between $1,000 and $3,000, while a DIY dry well project can be as low as $300 to $800 if you handle the digging and setup. Your final costs will depend on project size and local rates.
Could you provide a general cost range for installing subsurface drainage systems like French drains for an average-sized home? I’m trying to set a realistic budget before contacting any local contractors.
For an average-sized home, installing a subsurface drainage system like a French drain typically costs between $2,000 and $6,000. The exact price depends on factors like the length of the drain, depth, soil conditions, and whether landscaping needs to be restored. Getting a few quotes from local contractors will help you narrow down the estimate for your specific situation.
How often should I inspect or maintain a channel drain in my driveway to prevent clogs and make sure it works efficiently throughout the year, especially in areas with heavy rainfall?
For driveways with channel drains, especially in areas with heavy rainfall, it’s best to inspect and clean the drain at least every three months. During fall or after major storms, check more frequently for leaf build-up or debris. Keeping the grates clear and flushing the channel with water can help prevent clogs and ensure proper drainage all year.
When budgeting for a new drainage system, what are some hidden costs homeowners should be aware of that might not be obvious from the initial estimates, especially for subsurface options like French drains or dry wells?
When budgeting for subsurface drainage systems like French drains or dry wells, hidden costs can include soil disposal (if large amounts are excavated), landscape restoration after installation, unexpected obstructions like tree roots or buried debris, and permitting fees if required by your area. You might also incur extra charges for gravel, geotextile fabric, or additional piping if the original estimate didn’t fully account for site conditions or necessary materials.
Once a surface drainage system like a swale or channel drain is set up, how often should I be checking or maintaining them to avoid long-term issues? Are there seasonal chores I need to add to my routine?
For surface drainage systems such as swales or channel drains, it’s a good idea to inspect and clean them at least twice a year—usually in the spring and fall. After heavy storms, check for blockages or sediment buildup. In the fall, clear out leaves and debris to prevent clogs. Regular checks help you catch small issues before they become bigger problems.
You mentioned grading as a way to prevent water from collecting near the foundation. How difficult is it for a DIYer to properly grade a small yard, and what are some common mistakes to avoid during this process?
Grading a small yard is manageable for many DIYers, especially if the area isn’t too large or steep. The key is to ensure the ground slopes away from your foundation at a consistent angle, ideally about 6 inches over the first 10 feet. Common mistakes include not checking the slope with a level, piling soil too close to the foundation, and not compacting the soil, which can cause it to settle unevenly later. Take your time measuring and shaping the slope, and avoid using soil that holds too much water.
Is there a ballpark cost difference between having a contractor install a swale versus doing it yourself as a DIY project? I’m trying to figure out how much I could realistically save, factoring in potential errors.
Hiring a contractor to install a swale usually costs between $1,000 and $3,000, depending on size and site conditions. Doing it yourself could reduce costs to just materials and equipment rental—typically a few hundred dollars. However, DIY mistakes like incorrect slope or poor drainage can lead to extra repairs, which might offset your savings. If you’re confident in grading and soil management, DIY can be more affordable, but budget for possible corrections.
The article mentions that grading soil can help with surface drainage. If my yard already has a slight slope but still gets soggy in some areas, would grading alone usually be enough or should I consider adding swales or channel drains too?
If your yard already has a slight slope but still experiences soggy spots, grading alone might not always resolve the issue, especially if the soil is compacted or water is pooling due to low spots. In these cases, adding swales or channel drains can help direct excess water away more effectively. Assess where the water collects most and consider combining grading with other drainage features for the best results.
If I’ve already detected soggy landscaping near my foundation, which mistakes during installation should I be careful to avoid so I don’t make the situation worse?
If you’ve noticed soggy landscaping by your foundation, be careful not to install drains that slope toward your house, use undersized pipes, or neglect proper gravel placement. Avoid blocking natural water flow with landscaping features and don’t use poor-quality materials that can quickly clog or break. Double-check that water is directed well away from the foundation to prevent further issues.
I noticed you mentioned that French drains are especially useful for homes with clay soils or high water tables. Are there any signs a homeowner should look for that indicate a French drain would be a better option than just improving surface grading?
Yes, there are specific signs that suggest a French drain might be more effective than just surface grading. Watch for persistent soggy areas in your yard, water pooling near your foundation after rain, or basement dampness despite sloping the ground away from your home. If water seems to linger or seep in rather than drain off, especially in heavy clay soils, a French drain can help redirect that excess groundwater more effectively.
If I already have existing landscaping, what steps should I take to avoid damaging it during drainage installation projects like adding swales or channel drains? Are there certain tips for minimizing disruption that you recommend?
To protect your existing landscaping during drainage installation, start by clearly marking plants and features you want to preserve. Try to plan the drainage route around established trees and beds whenever possible. Use hand tools in sensitive areas instead of heavy machinery, and temporarily transplant small plants if they’re in the way. Laying down boards can help reduce soil compaction from foot traffic. After installation, restore disturbed areas with good soil and mulch to encourage recovery.
You mentioned that improper drainage can lead to mold and foundation problems. If I suspect water is already seeping into my basement, what should I do first before starting any DIY drainage project?
If you suspect water is seeping into your basement, your first step should be to identify and address the immediate source of the leak. Move any valuables away from affected areas, and use towels or a wet vacuum to remove standing water. Before starting any DIY drainage work, inspect your gutters and downspouts to ensure they are clear and direct water away from the foundation. It’s also wise to consult a professional for a thorough assessment, as underlying issues could require more than simple fixes.
How long does it usually take to notice improvements after grading the yard or installing a channel drain, and are there temporary measures you suggest while waiting for a full system to be installed?
You should start noticing improvements in drainage almost immediately after grading the yard or installing a channel drain, especially during the next rainfall. However, it may take a few heavy rains to fully see the results. While waiting for a full drainage system, you can use temporary measures like extending downspouts away from your home, placing sandbags to redirect water, or using temporary drainage pipes to prevent pooling near your foundation.
You mentioned common installation errors that can sabotage a drainage project. What would you say is the most frequent mistake homeowners make when trying to install their own French drain, and how can it be avoided?
The most frequent mistake homeowners make when installing a French drain is failing to provide the proper slope for water flow. Without a consistent downhill gradient, water can pool instead of draining away. To avoid this, use a level or string line to ensure your trench slopes at least 1% (about 1 inch drop per 8 feet) away from problem areas toward the drainage exit.
Could you elaborate on some of the most common installation errors you see with channel drains in driveways? I’m debating whether to try installing one myself or hire a contractor.
Some frequent channel drain installation errors include improper slope, which prevents water from flowing to the outlet, and setting the drain too high or low compared to the driveway surface. People also sometimes fail to secure the drain firmly, causing shifting over time, or neglect to bed the channel in concrete, leading to instability. If you’re comfortable with precision work and concrete, DIY is possible, but hiring a contractor can help avoid these pitfalls.
If I already have a swale in place but still experience water pooling near my building after heavy rain, do you recommend adding a subsurface solution like a dry well, or would more grading adjustments usually solve the issue?
If your swale isn’t fully addressing the water pooling, adjusting the grading to direct water further away from your building is often the simplest first step. However, if grading changes aren’t practical or enough, adding a subsurface solution like a dry well can help handle excess runoff. It’s a good idea to evaluate the slope and see if minor grading fixes the problem before considering more involved options.
Once a drainage system like a swale or channel drain is installed, how often should I check or clean it to keep it effective? Are there clear signs I should look for that indicate something is going wrong?
After installing a drainage system such as a swale or channel drain, it’s a good idea to inspect and clean it at least twice a year, especially after heavy rains or during the fall when debris can accumulate. Watch for pooling water, slow drainage, erosion around the system, or visible blockages—these are signs something may be wrong. Regular checks and prompt clearing of leaves or sediment help keep the system working well.
Can you share a ballpark range for the cost of installing a basic surface drainage system like grading or swales? I’d like to know what kind of budget we might be looking at before reaching out to any contractors.
For a basic surface drainage system like grading or swales, you can typically expect to spend anywhere from $1,000 to $4,000, depending on the size of the area and the complexity of the work needed. Factors like soil type, existing landscaping, and site accessibility may affect the final price, so it’s a good idea to get a few quotes for a more accurate estimate.
If a yard tends to develop soggy patches every spring but dries out in summer, is it better to focus on grading adjustments or invest in subsurface solutions like French drains?
Since your yard only gets soggy in the spring and dries out in summer, starting with grading adjustments is usually the most effective and cost-efficient approach. Regrading can help direct water away from trouble spots without major installation work. Subsurface solutions like French drains are best if grading doesn’t solve the problem or if water pooling persists. It often makes sense to try grading improvements first before investing in more complex drainage systems.
When choosing between surface drainage options like swales, channel drains, and grading, how do you decide which is most effective for a yard with a steep slope? Are there situations where combining them makes sense?
For a steeply sloped yard, grading is usually the first step to direct water away from your home. Swales work well for channeling runoff along the slope, while channel drains are useful if you need to collect water at specific points, like at the base of a slope or near hardscapes. Combining these methods often makes sense: grading for overall flow, swales for guiding water, and channel drains for targeted collection, especially in heavy rainfall areas or where water tends to pool.