Introduction: Why Subfloor Repairs Matter for Every Homeowner
The subfloor is the unsung hero of every home, providing the essential support framework beneath your finished flooring. While it’s out of sight, the subfloor’s health directly impacts comfort, safety, and the longevity of your floors—whether carpet, tile, hardwood, or laminate. Yet, many homeowners overlook subfloor issues until they manifest as squeaks, soft spots, or worse: mold, rot, and structural damage. Tackling subfloor repairs can feel daunting, especially with concerns about what’s involved, how much it will cost, and whether you can handle it yourself. This comprehensive guide demystifies the process, offering a step-by-step breakdown of costs, must-have tools, and actionable strategies to avoid the most common repair pitfalls. Whether you’re a DIY enthusiast or just want to understand what your contractor is doing, you’ll find practical advice to ensure your subfloor repair is durable, safe, and cost-effective.
Understanding the Subfloor: Types and Common Problems
What Is a Subfloor?
The subfloor is the layer of structural material between the floor joists (framing) and the visible floor covering. Most modern homes use plywood or oriented strand board (OSB), while older homes may have plank subfloors.
Signs Your Subfloor Needs Repair
- Squeaky or spongy spots when walking
- Visible sagging or uneven floors
- Moldy or musty odors
- Cracked, warped, or discolored floor coverings
- Persistent water damage or leaks
Common Causes of Subfloor Damage
- Water leaks from plumbing, appliances, or roofs
- Poor ventilation in crawl spaces or basements
- Termite or pest infestations
- Improper installation or use of low-quality materials
- Excessive foot traffic without adequate support
Cost Breakdown: What to Expect When Repairing a Subfloor
Factors Affecting Subfloor Repair Costs
- Extent of Damage: Small patch repairs vs. full-room replacement
- Material Type: Plywood, OSB, or specialty subfloors
- Location: Accessibility (e.g., main floor vs. tight crawlspace)
- Labor: DIY or professional contractor
- Additional Repairs: Joist rot, pest remediation, insulation replacement
Typical Cost Ranges
- Materials: $1.50–$3.50 per sq. ft. (plywood/OSB)
- Labor: $25–$35 per hour (professional rates)
- Full Room (200 sq. ft.): $500–$1,200 (DIY), $1,500–$3,000 (pro)
- Patch Repairs (2×2 ft.): $50–$150 (DIY), $200–$500 (pro)
- Additional Costs: Mold remediation ($500+), pest treatment ($200+), new insulation ($1–$2/sq.ft.)
Budgeting Tips
- Always budget a 15–20% contingency for hidden damage
- Get multiple contractor quotes for larger jobs
- Factor in disposal fees for damaged materials
- Check if insurance covers water or pest-related damage
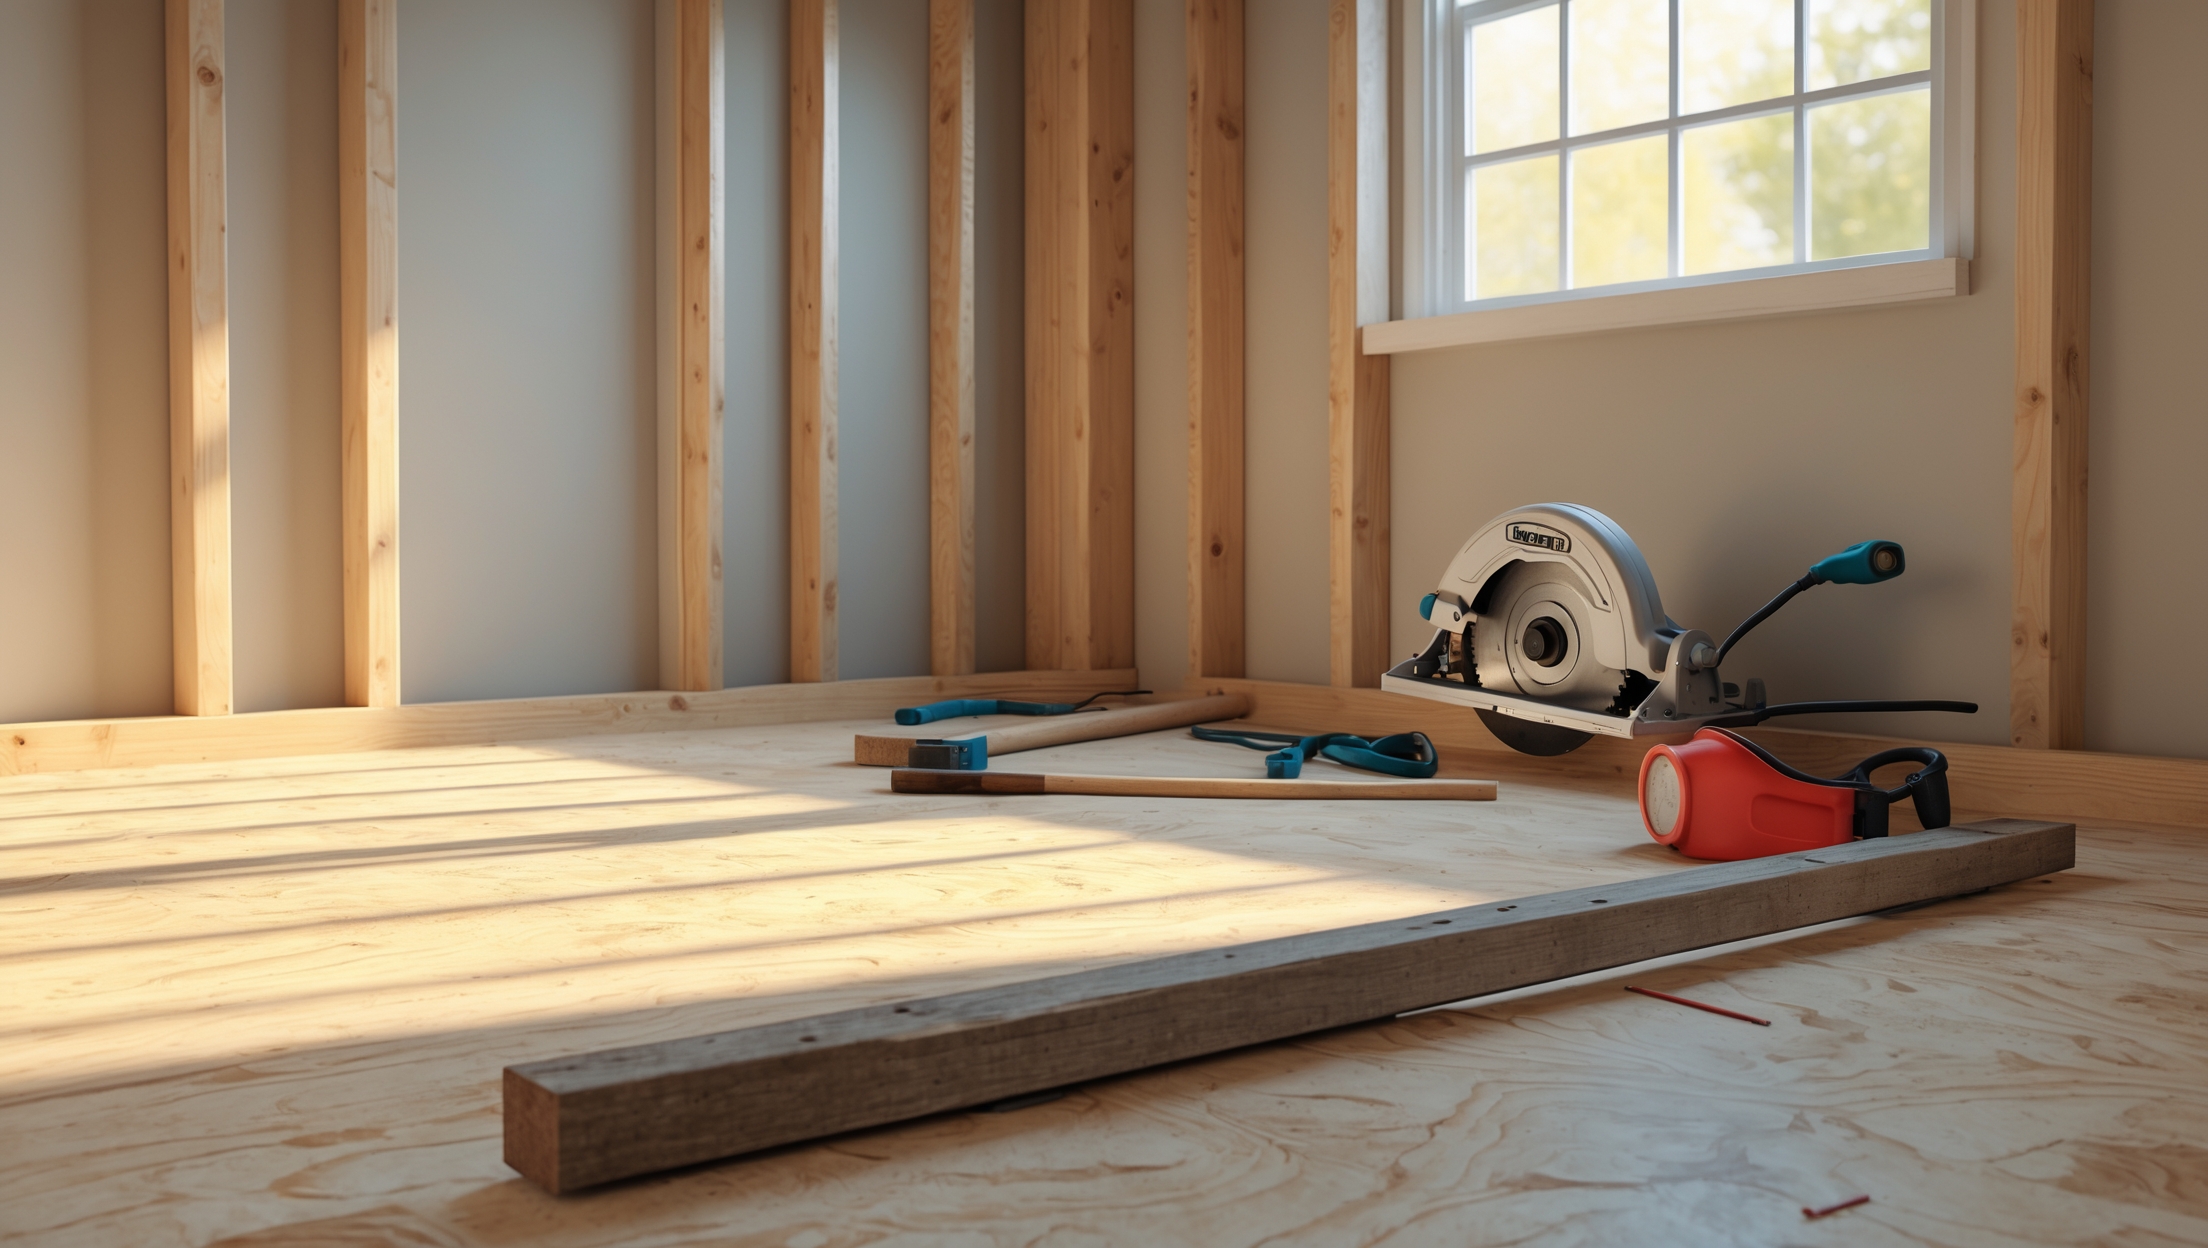
Essential Tools and Equipment for Subfloor Repair
Basic Tool List
- Pry bar and hammer (for removing trim and old flooring)
- Circular saw or oscillating multi-tool (for cutting subfloor panels)
- Drill/driver and screws (deck or subfloor screws recommended)
- Measuring tape and carpenter’s square
- Chalk line for marking straight cuts
- Utility knife
- Shop vacuum for debris
Safety Equipment
- Work gloves
- Safety glasses
- Dust mask or respirator (especially in moldy/dusty areas)
- Knee pads
Optional but Helpful Tools
- Jigsaw (for irregular cuts around vents or corners)
- Floor scraper (for removing adhesive or old flooring)
- Moisture meter (to check for hidden dampness)
Step-by-Step Guide: How to Repair a Damaged Subfloor
1. Assess and Locate the Damage
Walk the floor to identify soft spots, squeaks, or uneven areas. If you suspect water damage, use a moisture meter. Pull back a section of flooring if needed.
2. Remove Flooring and Expose the Subfloor
Carefully remove baseboards, then use a pry bar and hammer to lift the finished flooring. For carpet, roll it up and remove tack strips. For hardwood or laminate, gently pry up planks to avoid breakage. Dispose of damaged materials responsibly.
3. Inspect for Hidden Issues
Look for signs of mold, rot, or pest damage. Check floor joists—if these are compromised, they must be repaired or replaced before proceeding. Address any plumbing leaks or sources of moisture.
4. Cut Out the Damaged Subfloor
- Mark the damaged area with a chalk line and use a circular saw set to the subfloor thickness (usually 3/4 inch).
- Cut only over the center of joists for structural support.
- Remove nails or screws, then lift the damaged panel.
5. Prepare the Joists and Surrounding Area
- Clean joists of debris or old adhesive.
- If joists are soft or damaged, reinforce with new lumber (“sistering”) or replace as needed.
- Let the area dry thoroughly if there was moisture. Use fans or a dehumidifier.
6. Cut and Install New Subfloor Panels
- Measure and cut new plywood or OSB to fit the opening.
- Dry-fit the panel and adjust as needed.
- Apply construction adhesive to joists for a squeak-free finish.
- Lay the panel and fasten with subfloor screws every 6–8 inches along edges and joists.
7. Address Squeaks and Leveling
- Check for movement—add shims if gaps appear between subfloor and joists.
- Drive extra screws into squeaky spots.
- Use leveling compound if the surface isn’t even before reinstalling flooring.
8. Replace Flooring and Finishing Touches
Reinstall your floor covering per manufacturer instructions. Replace baseboards or trim. Vacuum thoroughly and check for any remaining issues before moving furniture back in.
Common Pitfalls to Avoid During Subfloor Repairs
- Ignoring Underlying Moisture: Failing to fix leaks or dampness leads to repeat damage.
- Underestimating Scope: Damage is often more extensive than it appears. Always inspect joists thoroughly before proceeding.
- Using Incorrect Fasteners: Nails can work loose over time; always use subfloor screws for longevity and squeak prevention.
- Skipping Adhesive: Construction adhesive on joists greatly reduces floor squeaks.
- Poor Panel Alignment: Not staggering seams or failing to cut panels over joist centers weakens the structure.
- Neglecting Safety: Old subfloors may contain asbestos (in adhesives or older vinyl underlayments)—when in doubt, consult a professional.
When to Call a Professional
- Extensive Mold or Rot: Large-scale mold remediation requires special handling.
- Compromised Structural Joists: Sagging or broken joists should be evaluated by a structural contractor.
- Suspected Asbestos: Never disturb old vinyl or adhesive without proper testing.
- Plumbing or Electrical Complications: Repairs involving utilities are best left to licensed pros.
Maintenance Best Practices: Keeping Your Subfloor Healthy
- Check for leaks annually under sinks, appliances, and bathrooms.
- Maintain proper ventilation in crawl spaces and basements.
- Seal gaps in exterior walls and foundations to prevent water ingress.
- Address pest infestations promptly.
- Ensure humidity levels stay below 60% in susceptible areas.
Conclusion: Invest in a Solid Foundation for Your Home
Subfloor repairs can seem intimidating, but a careful, informed approach makes all the difference. By understanding the structure beneath your feet, budgeting realistically, gathering the right tools, and learning the step-by-step process, you can restore your home’s foundation with confidence. Avoiding common pitfalls—like neglecting underlying moisture, using incorrect fasteners, or missing hidden damage—will save you time, money, and future headaches. Most importantly, don’t hesitate to call in professionals for complex issues like structural joist damage or hazardous materials. Regular maintenance and prompt attention to early warning signs can keep your subfloor in top shape for decades. Whether you’re taking on a small patch repair or a full-room overhaul, investing in your subfloor is investing in the overall health, safety, and value of your home. Start with a solid foundation, and everything else in your home improvement journey will stand stronger.
You mention that most modern homes use plywood or OSB for subfloors, but how can I tell which type I have in my house, and does it change how repairs should be done?
To tell if your subfloor is plywood or OSB, look at an exposed area such as an unfinished basement or under a vent. Plywood has layered sheets with a wood grain pattern, while OSB is made of small wood chips or flakes pressed together. Repair techniques are similar for both, but OSB can be more sensitive to water damage and may require extra care with moisture protection.
If my subfloor is only squeaking in a few spots, does that usually mean I have to repair the entire room, or can small patch repairs be enough? I’m trying to figure out how extensive the work might be before I pull up the flooring.
If the squeaks are isolated to just a few spots, you usually don’t need to repair the entire room. Small patch repairs or targeted fixes, such as screwing down loose boards or using special squeak repair kits, are often enough. You can address only the affected areas, which keeps the repair work less extensive and less costly.
As a small business owner who manages some older rental properties, I’m curious how you recommend distinguishing between subfloor issues caused by water leaks versus those from termites or pests. Are there specific signs I should look out for that would indicate which problem I’m dealing with?
To distinguish between water damage and termite or pest issues in subfloors, check for specific signs. Water damage often results in stains, warping, mold, or a musty smell. The flooring may feel spongy or uneven. Termite or pest damage usually features hollow-sounding wood, visible tunnels, piles of sawdust, or discarded wings. If you see pinholes or mud tubes, that’s typically insect activity. A professional inspection can help confirm the source if you’re unsure.
When hiring a contractor for subfloor repairs, what red flags should I watch for to avoid pitfalls like poor installation or the use of low-quality materials that you mentioned?
Be cautious if a contractor cannot provide references or recent examples of similar work. Watch out for vague estimates, unusually low bids, or a reluctance to put details in writing. Ask about the specific materials they plan to use—reputable professionals will specify brands and grades. Also, beware if they rush you to sign or ask for a large upfront payment before starting any work.
Could you provide more insight on how to tell if the musty odor in a room is definitely coming from subfloor issues versus something in the flooring or crawlspace? I want to address the right layer before starting any repairs.
To pinpoint the source of a musty odor, start by removing a small section of flooring in the affected area and inspect both the underside of the flooring and the top of the subfloor. If the smell is stronger beneath the flooring or you see discoloration, moisture, or mold on the subfloor, it likely indicates a subfloor issue. If the subfloor looks clean, check the crawlspace for dampness or mold, as odors can rise from there as well.
For a DIY repair, does the cost breakdown you provided include the price of renting specialty tools, or is it mostly for materials? I’m trying to get a full sense of what I’ll need to budget.
The cost breakdown in the article mainly covers materials like plywood, adhesive, and fasteners. It does not include the price of renting specialty tools such as a circular saw or a nail gun. If you don’t already own these tools, you should factor in rental fees, which can vary by location and rental duration. This will give you a more accurate estimate for your DIY subfloor repair budget.
You mention both plywood and OSB as common subfloor materials. Are there clear pros and cons between them when it comes to repairs or replacement, especially for older homes?
Plywood is generally stronger and holds fasteners better, which can be especially helpful in repairs on older homes where floors may be uneven or joists aren’t perfectly spaced. OSB is less expensive but can swell more if exposed to moisture, making it less ideal if water damage is a concern. For older homes, plywood is usually preferred for its durability and ease of working with during repairs.
After addressing the main causes of subfloor damage like leaks and poor ventilation, how long should I wait before installing new floor coverings to ensure the repaired subfloor is completely dry and stable?
Once you’ve fixed the main causes of subfloor damage, it’s important to let the subfloor dry thoroughly before installing new floor coverings. Generally, you should wait at least 48 to 72 hours, but this can vary depending on the materials used, room ventilation, and humidity levels. Make sure the subfloor feels completely dry to the touch and shows no signs of dampness or warping before proceeding.
I live in an older house with plank subfloors instead of plywood or OSB. Are the repair steps or tools different for plank subfloors, or can I follow the same advice listed here?
For plank subfloors, some steps and tools are a bit different compared to plywood or OSB. Plank subfloors may require you to use screws or ring-shank nails for a secure hold and you might need to replace individual planks instead of patching sections. Make sure to check for rot between planks and ensure everything is tightly fastened. The general approach in the article still applies, but pay extra attention to plank alignment and structural stability.
I noticed water damage is a common cause for subfloor issues. How can homeowners identify hidden leaks or moisture problems early on, before they lead to more severe subfloor repairs?
Homeowners can spot hidden leaks or moisture problems by regularly inspecting areas around sinks, toilets, tubs, and appliances for signs like discoloration, musty odors, or soft spots in the flooring. Using a moisture meter is a practical way to detect dampness behind walls or under floors. Also, check crawl spaces for dampness or mold, and address any plumbing leaks or poor ventilation promptly to prevent subfloor damage.
You mentioned cost breakdowns vary depending on the extent of damage. For a typical bedroom with a few spongy spots, about what kind of budget should I realistically expect as a DIYer, including material and tool costs?
For a typical bedroom with minor spongy spots, you can usually expect to spend between $150 and $400 as a DIYer. This estimate covers basic materials like plywood, screws, construction adhesive, and underlayment, plus tool rentals if you don’t own items like a circular saw or pry bar. The price may go up if you discover hidden water damage or need to replace more of the subfloor than expected.
When dealing with a moldy odor coming from the subfloor, is it enough to just replace the affected sections, or do you recommend adding ventilation improvements at the same time to prevent it coming back?
Replacing the moldy subfloor sections is essential, but it’s also important to address the underlying cause. Mold usually develops due to excess moisture and poor ventilation. Improving ventilation, such as adding vents or using a dehumidifier, will help prevent mold from returning. Handling both the damaged subfloor and airflow issues together gives you the best long-term result.
The article lists several signs like squeaky or spongy spots that may indicate subfloor problems. If I notice only minor squeaks but no visible damage or odors, should I be concerned about structural issues, or can these squeaks usually be fixed without major repairs?
Minor squeaks without visible damage or musty odors are often due to loose nails or wood movement rather than structural issues. In most cases, these can be resolved with simple fixes like tightening screws or applying construction adhesive. However, if the squeaks get worse or other symptoms develop, it’s wise to investigate further to rule out more serious problems.
You mention that older homes might have plank subfloors instead of plywood or OSB. Are there different tools or repair techniques I should use for plank subfloors, or can I follow the same steps outlined in the guide?
Plank subfloors do require some different considerations. Planks are often thicker and may be nailed rather than screwed, so you might need a pry bar and a nail puller for removal, and longer screws or ring-shank nails for reattachment. Always check for rot or damage along the planks and joists. While the general repair steps are similar, reinforcing or replacing planks may take more time than with plywood or OSB panels.
The cost section talks about small patch repairs versus full-room replacements. Is it possible to accurately estimate the repair cost before removing any finished flooring, or do surprises usually pop up once you start the work?
It’s challenging to provide a completely accurate repair estimate before removing finished flooring because there might be hidden damage, such as mold, water intrusion, or structural issues that aren’t visible from above. While you can get a rough idea based on symptoms and the area affected, it’s common for additional problems or costs to appear once the subfloor is exposed.
You mention that poor ventilation in crawl spaces is a common cause of subfloor damage. Would installing additional vents or a vapor barrier be more effective at preventing future problems, or should both be considered?
Both additional vents and a vapor barrier can be important, but their effectiveness depends on your climate and moisture issues. In humid areas, a vapor barrier is often more effective at keeping moisture out, while vents help in drier climates by improving airflow. In many cases, using both—properly installed—offers the best long-term protection for your subfloor, as this approach tackles moisture from multiple angles.
You mentioned OSB and plywood as common subfloor materials. What are the pros and cons of each if I’m considering a full-room subfloor replacement, especially in terms of durability and moisture resistance?
OSB (Oriented Strand Board) is generally more affordable and offers good uniformity, but it’s less moisture resistant than plywood. If exposed to water, OSB can swell and degrade faster. Plywood is stronger, handles moisture better, and holds fasteners more securely, making it a better choice for areas prone to spills or humidity. For high-traffic or potentially damp rooms, plywood is usually the recommended option for long-term durability.
For someone trying to stay on a budget, can you recommend which must-have tools are essential to buy versus ones that can be reasonably rented just for subfloor repairs?
For budget-conscious subfloor repairs, it makes sense to buy the essentials you’ll need repeatedly, like a pry bar, hammer, utility knife, tape measure, and safety gear. These are usually affordable and handy for future projects. Tools like a circular saw or a flooring nailer, which are pricier and used less often, can be rented just for the job to save money.
You mentioned must-have tools—are there any budget-friendly alternatives for essential tools that would still allow a small shop owner to handle minor subfloor repairs themselves?
Absolutely, there are budget-friendly alternatives for most essential subfloor repair tools. Instead of a power saw, a sturdy handsaw can suffice for small jobs. A basic pry bar and hammer are usually all you need for removing damaged boards. For measuring and marking, a tape measure, carpenter’s square, and pencil work well. While a cordless drill is ideal, a manual screwdriver can get the job done for minor repairs. These tools should cover most small-scale subfloor projects without a big investment.
When budgeting for subfloor repairs, how can I account for unexpected issues like hidden water damage or pest infestations? Is there a typical percentage I should add to the initial estimate to cover these surprises?
When budgeting for subfloor repairs, it’s wise to include a contingency fund to cover unexpected problems like hidden water damage or pest issues. Many homeowners add 10–20% to their initial estimate as a buffer. If your home is older or you suspect underlying problems, consider leaning toward the higher end of that range. This way, you won’t be caught off guard if additional repairs are needed.
When budgeting for subfloor repairs, how much of the total cost usually goes toward materials versus labor? I want to make sure I set aside enough for the most critical parts of the project.
For most subfloor repair projects, labor tends to make up the larger share of the total cost—often around 60–70%, with materials accounting for the remaining 30–40%. Materials include plywood, adhesives, screws, and any underlayment needed. Labor covers removal, installation, and finishing. These percentages can vary based on the size of the area, complexity of the job, and local labor rates, so it’s wise to get a few estimates before finalizing your budget.
For homeowners considering DIY subfloor repairs, what are the biggest pitfalls to watch out for during the process? Are there any tools or techniques you’d specifically recommend to make the repair safer and more effective?
When tackling DIY subfloor repairs, a common pitfall is not fully identifying the extent of the damage before starting—sometimes, water or rot spreads further than it seems. Always check for hidden moisture and ensure you’re not disturbing any electrical or plumbing lines. Using the right tools is essential: a circular saw, pry bar, safety goggles, and a moisture meter can make the job safer and more precise. Take your time measuring and cutting new panels for a snug fit, and never skip securing the subfloor with proper fasteners.
You mention that water leaks from appliances or plumbing are a common cause of subfloor damage. If I fix the leak but leave the affected subfloor alone for a few months, how quickly does mold or rot typically develop? Is there a point where replacement becomes unavoidable?
If a subfloor stays damp after a leak, mold can start growing within 24 to 48 hours, and wood rot may develop in as little as a couple of weeks, depending on conditions. If moisture sits for months, both mold and structural rot become likely, making replacement almost unavoidable. Promptly drying and assessing the area is the best way to avoid extensive repairs.
What are some warning signs I should watch for during the repair process that could mean there’s a bigger structural issue with the floor joists, not just the subfloor itself?
Watch for sagging or uneven floors that don’t improve as you work, widespread cracking or splitting in the floor joists, visible rot, mold, insect damage, or joists that feel soft or bouncy when pressed. If you see metal connectors or beams pulling away, or hear loud creaks from multiple spots, these could indicate deeper structural problems needing professional assessment.
You mentioned that subfloor issues can show up as squeaks or soft spots. If I only notice occasional squeaking in one area, does that always mean the subfloor needs repair, or could it be another problem like loose floorboards?
Occasional squeaking in one spot doesn’t always mean the subfloor is damaged. It could just be loose floorboards or nails that have worked out over time. You might be able to fix it by securing the floorboards without major repairs. However, if you also notice soft spots, sagging, or moisture, then subfloor repairs may be needed.
The article mentions water leaks as a common cause of subfloor damage. If I had a plumbing leak last year but don’t see visible mold or musty odors now, should I still be concerned about hidden subfloor issues?
Even if you don’t see mold or smell musty odors, it’s still possible that hidden subfloor damage remains from the past plumbing leak. Water can weaken subfloor materials or cause issues that aren’t obvious right away. If you haven’t already, consider checking the area for any softness, sagging, or discoloration in the flooring above. If you’re unsure, having a professional inspect it can give you peace of mind.
You mentioned different subfloor materials like plywood and OSB. For a high-traffic retail space, which material holds up better over time, especially in terms of resisting squeaks and sagging?
For a high-traffic retail space, plywood is generally the better choice over OSB. Plywood has greater strength, holds fasteners more securely, and resists sagging and squeaking better under constant foot traffic. While OSB is more budget-friendly, plywood’s durability and stability make it more suitable for commercial environments where longevity is key.
I see that persistent water damage is a big concern for subfloors. Once water damage is addressed, what steps do you recommend to prevent mold or rot from coming back after the repair?
After fixing water damage, it’s essential to keep the area dry and well-ventilated to prevent mold or rot from returning. Use a moisture barrier like a vapor retarder under the flooring, and make sure any leaks or sources of moisture are fully repaired. Regularly check for signs of dampness, and consider using a dehumidifier in humid areas. Sealing gaps and maintaining good airflow will also help ensure your subfloor stays protected.
If my subfloor is showing sagging in just one corner of the room, is it possible to patch only that section, or is a full replacement typically recommended? I’m not sure how to tell if the damage is isolated or affecting the entire room.
If the sagging is limited to one corner and the rest of your subfloor feels solid, patching just that section is often possible. However, it’s important to check for wider issues like moisture damage, rot, or joist problems under the surface. Try probing surrounding areas for softness or movement. If only the corner is affected and there’s no underlying spread, a localized repair should suffice, but a full replacement is needed if damage is extensive or structural.
You listed poor ventilation in crawl spaces as a common cause of subfloor damage. Could you explain what actions a homeowner can take to improve ventilation and whether that should be done before or after making repairs?
Improving crawl space ventilation usually involves installing or cleaning vents, adding a vapor barrier, or even using a dehumidifier. It’s best to address ventilation issues before making subfloor repairs. This way, you prevent future moisture problems from damaging your new or repaired subfloor. Fixing the underlying cause first helps ensure your repairs last longer.
I noticed you listed water leaks and poor ventilation as common causes of subfloor damage. If a homeowner only sees musty odors but no obvious leaks, what’s the best first step to pinpoint the source?
If musty odors are present without visible leaks, start by checking areas with limited airflow, like under sinks, around appliances, or near exterior walls. Inspect for dampness, discoloration, or soft spots in flooring. Using a moisture meter can help detect hidden moisture in the subfloor. Also, make sure bathroom and kitchen exhaust fans are functioning properly, as poor ventilation can contribute to moisture buildup.
You mention that sagging or uneven floors can be a sign of subfloor issues. How do I tell if the problem is really with the subfloor and not just the flooring itself, like warped boards or tiles?
To determine if the issue is with the subfloor rather than just the flooring, look for signs like bouncing, spongy spots, or floors that slope noticeably over a larger area. If you remove a section of flooring and see damage, rot, or unevenness in the wood underneath, that’s a clear subfloor problem. Warped boards or tiles usually show localized damage, while subfloor issues affect larger sections.
Do you have any tips on staying within budget for a DIY subfloor repair project? I’m trying to avoid the typical pitfalls that could lead to unexpected expenses as mentioned in the article.
Planning ahead is key to staying within your budget. Measure the area carefully so you only buy the materials you need, and consider renting expensive tools instead of purchasing them. Be thorough when inspecting for damage so you address all problem areas in one go, which helps prevent repeat costs. Always keep a small contingency fund for surprises, but following these steps can help you avoid most unexpected expenses.
Could you expand on how water leaks from plumbing or appliances specifically affect subfloor materials like OSB versus plywood? I want to make sure I use the most durable option for a high-traffic retail space prone to occasional spills.
Water leaks impact OSB (oriented strand board) and plywood differently. OSB is more prone to swelling, warping, and losing strength when exposed to moisture because it absorbs water at the edges and between its wood strands. Plywood is more resistant due to its cross-laminated layers, making it better for wet or high-traffic areas like retail spaces. For durability where spills or leaks might occur, plywood is generally the safer, longer-lasting choice.
If I decide to hire a contractor instead of doing a DIY repair, what questions should I ask to make sure they’re using quality materials and not cutting corners, especially with older plank subfloors?
When speaking with a contractor, ask what specific materials they plan to use, such as the grade and type of plywood or lumber for your subfloor. Request details on fasteners and adhesives. Ask if they’ll inspect and prepare the framing beneath, and how they’ll address any damage or unevenness. Check if they’re familiar with repairing older plank subfloors, as these can present unique challenges. Finally, ask for references from similar past projects to ensure their work quality.
I’m curious about the cost breakdown for subfloor repairs. How much does the type of material (like plywood versus OSB) actually affect the final price, and are there scenarios where it’s worth upgrading to a higher-quality subfloor material?
The material type does have a noticeable impact on subfloor repair costs. Plywood generally costs more than OSB, sometimes by $5–$10 extra per sheet, but it’s also stronger and more resistant to moisture. Upgrading to higher-quality plywood is often worth it in high-moisture areas like bathrooms or kitchens, or if you want a longer-lasting, sturdier floor. For dry areas and tight budgets, OSB is a common, cost-effective choice.
Could you give a ballpark estimate for DIY subfloor repairs versus hiring a contractor? I’m concerned about whether the savings are really worth the extra effort and risk as a busy parent.
DIY subfloor repairs typically cost between $1 to $3 per square foot for materials like plywood, screws, and adhesive. Hiring a contractor usually ranges from $4 to $8 per square foot, including labor. While DIY can save you money, it requires time, proper tools, and careful attention to avoid mistakes. As a busy parent, paying for professional help might be worth it for peace of mind and a faster, hassle-free repair.
The article talks about water leaks being a common cause of subfloor damage. If the source of the leak has already been fixed, do you still need to replace sections of subfloor that feel only slightly soft, or is there a way to reinforce them without full replacement?
If the subfloor feels only slightly soft, you may be able to reinforce it instead of replacing it, as long as the wood isn’t moldy or structurally compromised. Reinforcement can involve adding extra support from below, like sistering joists or screwing plywood patches over the soft area. However, if the softness is spreading or the wood is deteriorating, replacement is safer to prevent future damage. Carefully inspect the area before deciding.
If my subfloor is squeaky in just a few spots but not spongy or visibly damaged, is it worth replacing just those sections, or would it be smarter to reinforce the joists instead? What tools would I need for either approach?
If your subfloor is only squeaky and shows no visible damage or softness, a full replacement usually isn’t necessary. Reinforcing the joists or securing the subfloor to the joists will often resolve squeaks. For this, you’ll need tools like a drill, wood screws, a stud finder, and possibly construction adhesive. Only consider replacing sections if you discover actual damage during inspection.
The article mentioned that water leaks and poor ventilation can cause subfloor damage. If I already fixed a leak, what steps should I take to make sure there won’t be lingering issues like hidden mold or rot under my floor?
After fixing the leak, it’s important to let the area dry thoroughly using fans or a dehumidifier. If possible, lift a section of flooring to inspect the subfloor for any signs of mold or rot, such as discoloration or a musty smell. If you notice any, clean or replace affected wood. Monitoring the area for new odors or soft spots in the floor over the next few weeks can also help catch lingering issues early.
You mention that water damage is a common cause of subfloor problems. For clients with older homes and possible mold or rot, what kind of safety precautions or PPE do you recommend for small repair jobs?
When dealing with mold or rot in subfloor repairs, it’s important to wear N95 or higher-rated respirators to avoid inhaling spores, along with gloves and safety goggles. Long sleeves and pants protect your skin. Ventilate the area well. If you notice extensive mold or a musty smell, consider sealing off the work area with plastic sheeting and consult a professional if the contamination seems widespread.
If a patch repair is needed instead of a full replacement, what are some common pitfalls to watch out for so that I don’t make things worse and end up needing a more expensive fix later?
When patching a subfloor, make sure you cut out all damaged material and avoid leaving any soft or rotted spots. Use the same thickness and type of plywood as the existing subfloor, and ensure all seams are well supported by joists. Secure the patch firmly to prevent squeaks and unevenness. Also, check for any underlying issues like moisture or structural damage before patching, so you don’t just mask a bigger problem.
The article mentions that water leaks and poor ventilation are common causes of subfloor damage. How do you recommend inspecting for hidden moisture problems before starting repairs, especially if there are no obvious surface signs like discoloration?
To check for hidden moisture issues, use a moisture meter on your subfloor, especially near plumbing and exterior walls. Look for any musty odors, which can indicate mold or dampness even if you can’t see it. Also, gently press or walk on the floor to feel for soft or spongy spots. If in doubt, you might want to lift a small section of flooring to inspect the subfloor directly before beginning repairs.
The article mentions both OSB and plywood as common subfloor materials. If our home is older and has plank subflooring, are the repair techniques or tools any different compared to newer materials?
Yes, if your home has plank subflooring, the repair techniques and tools can be a bit different. Plank subfloors are typically made of solid wood boards, not panels. You’ll often need to use screws or nails suitable for thicker, solid wood, and may need to cut and fit individual planks instead of sheets. Also, check for rot or insect damage, which is more common in older planks, and be prepared to add blocking or extra support if the planks are uneven or weakened.
When dealing with an older home that still has plank subfloors instead of plywood, are the repair costs or strategies significantly different? Curious if replacement makes more sense than patching up specific damaged areas in this case.
Older homes with plank subfloors can present different challenges compared to plywood. Repair costs may be higher because planks can be harder to match and often require more labor to refasten or replace. If damage is localized, patching specific areas may work, but widespread issues or extensive rot usually make full replacement with plywood a better long-term solution for stability and compatibility with modern flooring.
For homes with older plank subfloors rather than plywood or OSB, are there differences in repair technique, material costs, or tools needed compared to what’s outlined for modern subfloors in the article?
Older plank subfloors do require a different approach than modern plywood or OSB. Repairs often involve replacing or securing individual planks, which can mean higher material costs if matching old lumber is needed. Tools like pry bars and circular saws are useful, but you might also need wood shims and more fasteners. Techniques may differ too—planks can be more brittle, so care is needed to avoid splitting. Always check for hidden nails before cutting or prying.